In this article, we will be covering the different ways in which custom fields can be added to an advanced report, as well as some potential troubleshooting questions that may come up when you try to implement them into your reports.
The method by which you choose to add custom fields to your report usually comes down to preference or to niche circumstantial factors that require one approach over another.
Method #1 - Custom Field Functions
The easiest way to add custom fields to a report is to make use of the suite of pre-written custom field functions that come with your Case Manager system by default. To bring this code into your report, you must first make sure that the following line is present at the top of your code.
This Include function allows for external code stored on your system to be brought into your report. Using this, we can call on the customFields include and gain access to a useful set of functions for bringing custom fields into your report.
When you would normally bring in a property in the SELECT section, you instead insert the following code.
This line of code call ones of the pre-written commands from the include that is designed to pull out the contents of a specific custom field in your system by name. If you replace the contents between the speech marks (') as follows, you can bring out data from any custom field in the system:
- reportData - The name of the JOIN where the data is being pulled from (Case, Client, caseAction etc.)
- customFieldName - The internal name of the custom field. This can be found if you access the field list from the Custom Fields screen in the Administration area.
- customFieldType - The type of data that the field supports (String, Boolean, Vocabulary Value etc.). The names for these fields will differ depending on the field type.
| Data Type | Name in Function |
|---|---|
| Date field | dateValue |
| Boolean field | booleanValue |
| Float field | floatValue |
| Integer field | integerValue |
| String field |
stringValue |
| Text field | textValue |
| Time field | timeValue |
| Timestamp field | timestampValue |
| Address field | addressValue |
| Mapped location field | ??? |
| Url field | ??? |
| Unique reference | uniqueReferenceValue |
| Vocabulary value field / single-value picklist | vocabularyValue |
| Vocabulary values field / multi-value picklist | See Multi-Value Picklists below |
➡ Note: For single-value picklists and vocabulary value fields, the function name needs to change from customField to customVocabularyField to have access to the correct code. This is because the functionality behind regular fields and vocabulary fields is different, so a new function needs to be called to operate on that data.
Method #2 - Direct Insertion
In some instances, you may not be able to make use of the pre-written function to get custom field content to appear. This may be because you need to be able to use the custom field in the WHERE section of the report, or because there are multiple fields on that entity that make use of the same internal name. To get around this problem, we can instead directly add the custom field to the FROM section via JOINs.
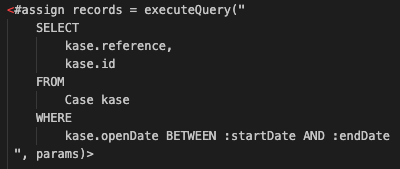
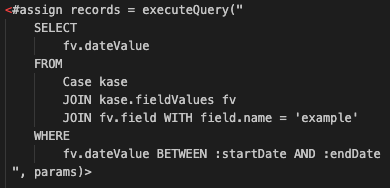
In this example query, we are finding a custom field called example that is found at the Case level, and are filtering the report such that the dates we find are within a set date range defined by two parameters.
The first JOIN is to the fieldValues object; this holds the content of every custom field found on this record, so in this instance it contains the values of every field filled in on a Case. The second JOIN is to the field we want to get data from, which we are then targeting by name through the additional of a WITH clause. When we want to make use of the content of this field, we need to pull out the value through the type of the data that the field stores. In this case, example is a date field, so we need to target the dateValue property; these use the same names as those we supply to the customFields function in method one.
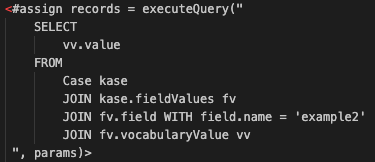
As mentioned in method one, the code behind vocabulary fields is different than that of other custom fields. This is because we need to target the type of data in the field and then further specify that we are bringing out the contents of the vocabulary field rather than just bringing out the field as a whole. In the code, this means that we need to add a third JOIN to link from the field values to the vocabulary value as shown above.
Multi-Value Picklists
With both of the methods we have used for bringing out custom fields, one issue you may have noticed is that these fields can only bring out one value at a time; this is a limitation with HQL queries and we may run into duplicate data being output in the report as a result of this. Since multi-value fields can hold multiple different values at a time, neither method will work for adding them to your reports.
To get around this, we will need a means of bringing out each of the individual values held in the custom field, then stringing them together in the report's table.
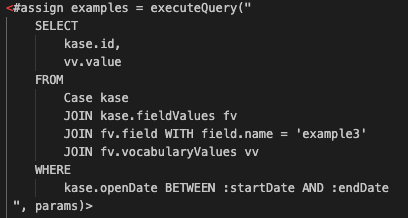
The first step to doing this is to write out a separate query specifically for getting out the custom field values. In the example below, we are bringing out every case opened within a date range as well as the values of the example3 custom field. This will bring out duplicate instances of the same case because of this field holding multiple values. For example, if example3 had three values in it, we would have three separate rows of a case with an ID of 2 and the three values in that custom field one after the other.
In this query, we brought out the ID of the case alongside the values of the custom field. This is important because we need a unique idenifier for the entity we are trying to get the data from so that we can determine which case each value belongs on. In the main query for the report that we are getting our other data fields in, we will add the ID to this query as well because we intend on matching these values together between the cases and the field values. This will allow us to sync them together properly and allow the right values to appear on the right cases.
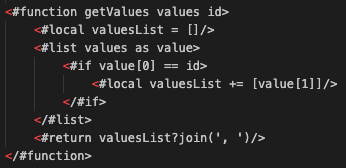
To summarise, this function will take in the separate query of custom field values we made before, then it will compare the case IDs from that query with the case ID from the main records query. If they match, it adds that value to a comma separated list. This repeats until it clears the whole list and has added all of the values for this case to a singular list, which is then returned as the result of the query.
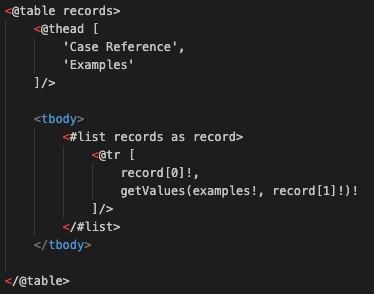
In the Table section, when we reach the line in the query that we would output the ID on, we will instead call the getValues function we just created on that line. We do this by stating the name of the function, then supplying it with the name of the separate query and the index number of the case ID from the records query.
Once that is done, the report can now output the values of the multi-value picklist in a single column.


Alex Bird
Comments